Have you ever wondered how to make latte art? You know, those beautiful designs that your barista makes with silky milk. Well, this silky milk is actually known as microfoam and knowing how to make microfoam is the first step to learning how to create latte art.
Here, we’ll walk you through everything you need to know about microfoam milk, from what it is to the drinks you can make with it and more.

What is Microfoam?
The secret between a good cup of joe and an amazing one is all in the milk. More specifically, the foam. The microfoam.
The word microfoam refers to that finely steamed layer of milk. It’s typically whole milk that’s steamed and then poured carefully onto the surface of lattes.
Microfoam’s texture is very velvety. It has little to no air bubbles, which make it silky from top to bottom. This said, it takes some practice to master the art of making microfoam, but once you have it down, you’re opening the door to even better coffee and latte art!
How to Make Microfoam at Home
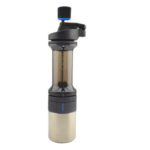
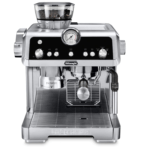
There are a few ways to make microfoam at home. For starters, you could invest in an automatic frother (espresso machine) which will heat the milk for you and create some microfoam in minutes. This does require an investment, but it’s well worth it. Afterall, with an espresso machine, you’ll be able to make more than just quality microfoam!
The secret to making amazing microfoam is in the temperature of the milk. If it’s too hot, you’ll end up with a stretched-out texture.If it’s too cold, you’ll get a wet, mushy texture. You want to aim for a temperature of 140-160 degrees Fahrenheit. It’ll take some practice to nail down the temperature, but with the help of a thermometer and some patience, you’ll have it down stat.
Here is a quick step-by-step guide on how to make microfoam using a steam wand.
- Grab your milk pitcher and fill it halfway with milk. The size of the pitcher depends on how much microfoam you need.
- Lower the tip of the steam wand just below the surface of the milk.
- Turn on the steam wand and move the tip to the surface again. Raise the tip of the wand up and down to create air bubbles.
- Do this until you’ve created the amount of microfoam you want or until the milk is at the right temperature. If the pitcher is too hot to lift, the milk is too hot.
- Knock the pitcher on your surface to break up any small air bubbles.
- You should now have some velvety milk ready to splash into your latte, cappuccino, or espresso.
You can also make some microfoam milk using a frother; however, please note you’ll first have to steam your milk to the right temperature and then froth. This does require a learning curve, but with some practice and patience, you’ll get there.
What’s the Difference Between a Frother and a Steam Wand?
You can get frothed milk from either a frother or a steam wand. The difference is that steam wands produce steamed milk. Frothed and steamed milk are not the same thing.
Frothing is good for introducing air into the milk, which results in bubbles and foam.
When you hold a steam wand the right way, you can produce frothed, steamed milk. This is what we’re going for when we make microfoam.
Keep in mind that it’s cheaper to heat up your milk to the right temperature and then use the frother, than it is to invest in an espresso machine that will do both at once.
What Drinks Can I Make With Microfoam?
Of course, there are cafe lattes. However, you can also make delicious cafe au laits and cappuccinos with microfoam. Some people – ourselves included – also like to make cappuccinos using macrofoam. But, for lattes or cafe au laits, microfoam is best.
Final Thoughts
Now that you know all the basics of microfoam, you can go out there and try your hand at it. Practice makes perfect and before you know it, you’ll work your way up to latte art. Don’t be surprised when you start making drinks like a professional barista. Happy caffeinating!